Python notebooks use packages: collections of reusable code that perform tasks like processing data, making maps, or analyzing signals. A notebook may need packages that aren’t available at run time. An environment is a way to keep all of those packages organized in one tidy, self-contained workspace.
When you launch GeoLab, you are in environment with commonly used geophysical packages. This guide shows you how to create your own environment in GeoLab.
What Is a Package Manager?
GeoLab uses a tool called conda to install and manage packages. Think of conda like an app store for Python packages: you tell it what you want, it figures out what else is needed to make it work, and installs everything together.
Heads up: GeoLab resets when you sign out, so any packages you installed during a session won’t be there next time. The solution is to define your environment in a file (explained below) so you can recreate it anytime.
See What’s Already Installed
Open the terminal in GeoLab and try these commands to get your bearings.
See all available environments:
conda env listThe one with a * is the currently active environment:
# conda environments:
#
base                  *  /srv/conda
notebook                 /srv/conda/envs/notebook
custom_environment       /home/jovyan/.conda/envs/custom_environment
See all packages in the current environment:
conda listThis prints a long list. Each row shows a package name, its version, and where it came from:
# Name                    Version                   Build  Channel
cartopy                   0.24.1          py312h78ddc71_0    conda-forge
numpy                     2.2.4           py312h7e3fe57_0    conda-forge
obspy                     1.4.1           py312h7b8d3f4_0    conda-forge
xarray                    2025.3.0           pyhd8ed1ab_0    conda-forge
…
Installing a Package Without Creating a New Environment
If you just need to add one or several packages, you can install them directly from inside a notebook cell using the line magic % command. This installs into the notebook’s active environment:
%conda install -c conda-forge pandasOr, for packages only available on PyPI (a different package source):
%pip install earthscope-sdkWarning: Installing with
%condainside a notebook can use a lot of memory because it checks for dependency conflicts among packages and selects the correct packages fix conflicts. If your notebook becomes unresponsive or the kernel crashes, use theenvironment.ymlapproach instead, which is more reliable for larger installs. Installing packages with pip uses less memory but does not fix dependency conflicts. Try installing with conda first, use pip if the package is not available in the conda-forge repository.
Create Your Own Environment
The best method to create a custom environment is to write a file that lists every package required. Conda reads the file and builds the environment from it. This ensures you can recreate the exact same environment later, and the file can be shared, making the environment reproducible.
Step 1: Write an environment.yml File
Open an editor, create a new file called environment.yml, and add the following:
name: my_environment
channels:
  - conda-forge
dependencies:
  - python=3.11
  - ipykernel
  - numpy
  - matplotlib
  # Pip-specific packages
  - pip:
    - seisbench
Here’s what each part means:
name: What to call the environment.
channels: Where to download packages from (
conda-forgeis a large, reliable source).dependencies: The packages to be installed.
ipykernelis required so the environment can be used as a notebook kernel, so always include it.- pip:installs packages only available in the PyPI repository, such as seisbench. The majority of pip packages will install without a dependency conflict. If a conflict exists when running your code, Python will provide an error message and suggest the versions of packages that do not conflict. You will have manually resolve the conflict by installing the suggested packages.
Replace numpy, matplotlib, or seisbench with the required packages.
Step 2: Build the Environment
In the terminal, run:
conda env create -f environment.ymlAlternatively, if you want to permanently add packages to the default GeoLab environment, you can export environment.yaml and edit the file with packages you want to install.
conda env export > environment.ymlConda will figure out which versions of everything are compatible and download them. This can take a few minutes, which is normal.
If it fails: Read the error message. Conda usually names the package that’s causing the problem. Try removing it from the file or changing its version.
Step 3: Activate the Environment
conda activate my_environmentActivating an environment switches the terminal into that workspace, so any Python commands you run use that environment’s packages. The terminal prompt will update to show the environment name, confirming it worked.
Step 4: Register It as a Notebook Kernel
A new environment isn’t automatically available in Jupyter notebooks. To use the newly created environment, it has to be registered. Run this command in the terminal to register it:
python -m ipykernel install --user --name my_environment --display-name "Python (my_environment)"Step 5: Switch to Your Environment in a Notebook
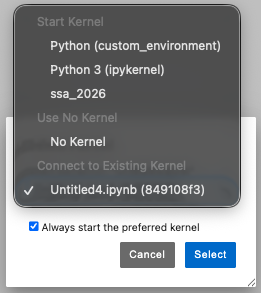
Open a notebook and go to Kernel > Change Kernel…
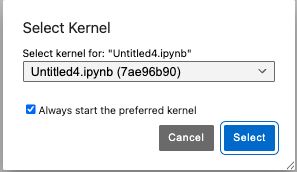
Select Python (my_environment).
Check the upper-right corner of the notebook to confirm the kernel changed.
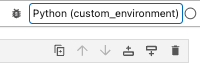
Note: This must be done for each notebook separately. There isn’t a way to set it as the default for all notebooks.
Quick Reference for Environments
| What you want to do | Command |
|---|---|
| See all environments | conda env list |
| See installed packages | conda list |
| Activate an environment | conda activate <name> |
| Leave an environment | conda deactivate |
| Build from a file | conda env create -f environment.yml |
| Register as a kernel | python -m ipykernel install --user --name <name> --display-name "<label>" |
| Install a package (in notebook) | %conda install <package> |
| Install from PyPI (in notebook) | %pip install <package> |
Installing Non-Python Software
Software that is not purely Python can be installed with either the Ubuntu package manager, apt-get, or compiled from source.
Installing Ubuntu Packages
Some software can be installed via the terminal using apt-get. Be advised that users cannot run commands as superusers; i.e., sudo will not work, and permissions cannot be granted to individual users. If you need to install something foundational, please create a custom image.
C/C++/Fortran Compilers
GeoLab images have gcc, g++, and gfortran installed. You will need to move the application source files to your home directory and compile them within GeoLab.